
We are delighted to host a guest post from @teacherglitter, whose Year 5 pupils have been hugely inspired by a creative literacy sequence using the wordless picture book ‘Flotsam’.
The book is available to order online from Amazon or Bookshop.Org.
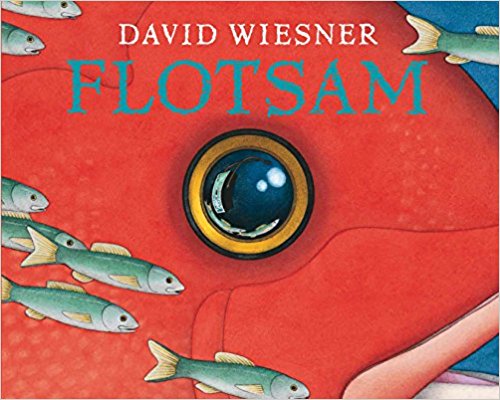
I have been aware of the wonderful wordless picture book Flotsam, by David Wiesner, for several years now but for some reason or other, I have never found the right opportunity to use it within my Literacy lessons.

That all changed when I moved year groups into Year Five and to my joy, discovered one of our topics was about pollution. I decided I wanted to focus on the devastating problem of plastic waste and micro plastics on our ocean ecosystems and animals. I finally had the perfect opportunity presented to me to use this stunning book and I began to get excited.
On opening the book, I knew I was in for a visual treat when I was greeted with a title page surrounded by curious and wonderful items of flotsam. The rest of the book did not disappoint. With every re-reading, I saw something new and I had to prise it away from my own two children at home who were equally enamoured with the colourful, imaginative images dancing off the very pages.
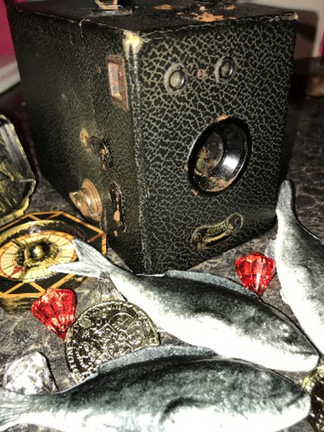
For those unfamiliar with the book, we follow the adventures and investigations of a curious little boy, with a seeming passion for science, until he stumbles upon a mysterious camera. Upon getting the photos developed, we discover the camera is not all it appears; the next series of surreal and exciting illustrations capture the images of these mysterious photographs.
Around the time of my camera delivery, I saw a wonderful post on Twitter by @primaryteachew using shoes to generate questioning and inference skills in children. It inspired me to think how I could adapt it somehow to use in my lessons and my Flotsam trays were born. I created 6 trays in all and filled them with a mixture of exciting ‘flotsam’ for the class to investigate and generate ideas about who the owner of the items might be and make inferences about the character.
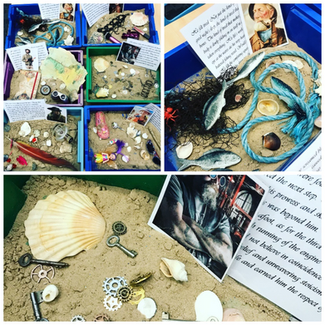
The trays I created were as follows:
1. A steampunk engineer- I added old keys and cogs and springs.
2. A small child- I put in a small plastic jelly shoe, some small sunglasses, a toy and a few sweets.
3. A female pirate- I included gem stones, a large macaw feature, an empty bottle of liquor, a parrot earring and some gold coins with pirate ships on them.
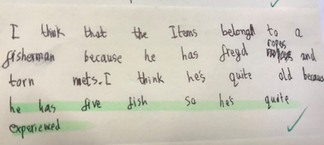
4. A fisherman- I put in some plastic fish, netting and rope.
5. A wealthy lady- lots of fancy, vintage looking jewellery. A perfume bottle, lip stick and make up brush.
6. An explorer- I made a tea-stained map of South America and added a compass, diary and some binoculars.
The planning all fell into place after I had that ‘wow hook’ to kickstart the topic and I will outline the lessons I taught and share some photos of the fabulous work my amazing class produced.
Day One
I began by just showing the front cover of the book to the children and getting them to think about what the word flotsam meant. I also asked them to think what the picture on the front was, and as I suspected, they had no idea what a camera lens was. I then showed them my real camera and opened it up and explained how it worked. I also showed them the inside page of the book with all the glorious pictures of debris washed up on the beach.
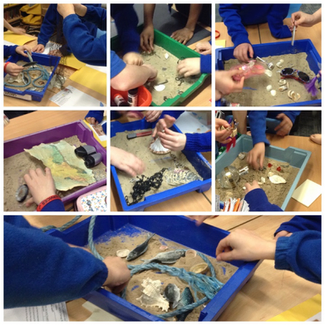
I explained to the children they would be investigating some trays with items in that were washed to shore and, in small groups of 4 or 5, they would investigate the items and orally discuss as a team who they might belong to but more importantly why did they think that.
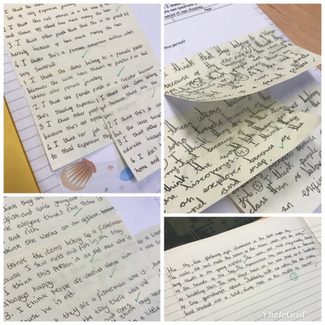
Well, you can imagine the buzz and excitement as they moved around each table exploring the finds. I had some interesting gender debates, as I had left the sex of the explorer ambiguous, but they automatically assumed it was a man.
After they had visited each table, they shared ideas with excellent reasoning about why they had come to the conclusions they did. I then showed the children 6 photos and we matched them to the tray and they recorded some of their ideas on post-it notes in their books. I particularly liked this comment made by a child shown in the photo below:
The final element to the lesson was a next step challenge. I shared some pre-written back stories for the characters and challenged the class to create their own.
Day Two
The second day we looked at the book properly. They were fascinated by the fact it did not have words and loved the idea that everyone who reads it would do so in a different way. They were mesmerised by the images and I took a long time asking open-ended questions and allowing child-led discussion and questioning. I stopped the book after the last surreal photograph (before the page with the photo of the child) and modelled the task for the day. I had seen some fabulous investigation grids created by a teacher in a support forum to generate inference skills using pictures and focusing on the elements of observe, wonder and infer. I knew this activity would fit perfectly with the book and here are some examples of the work produced:
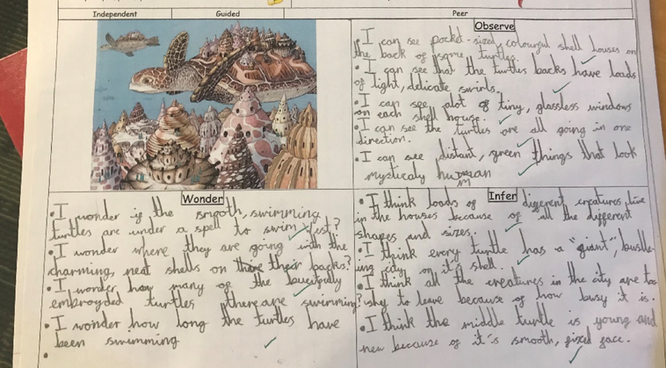
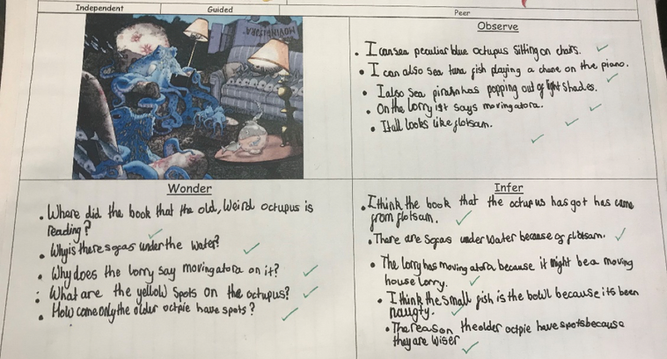
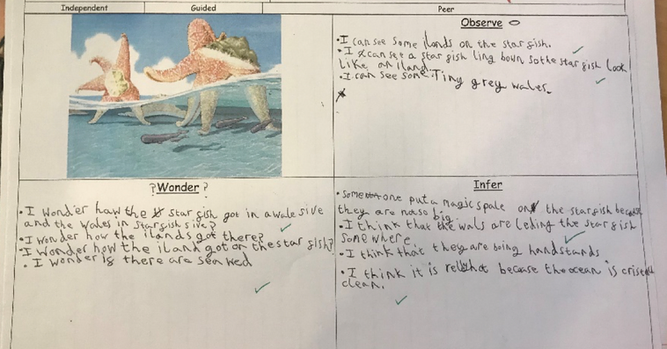
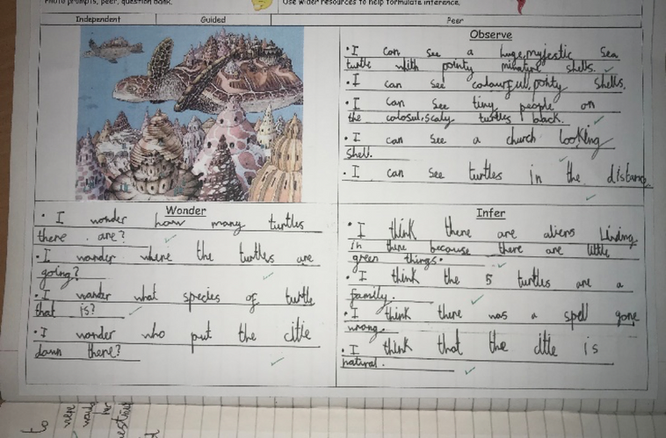
The activity was beautifully simple and inclusive for all the children. I was blown away with the ideas and the reasoning they had behind them. I will be definitely using these grids for other activities again in the future.
Day Three
We continued our Flotsam adventure picking up where we had left the story off and the children were enchanted by the idea of a child holding a photo of a child who in turn is holding a photo of a child. We had an interesting discussion about the dilemma faced by the boy whether to keep the camera or throw it back out to sea so other children could continue the adventure. As the story ended with the camera washing up on a new beach to be discovered, this led me to a ‘wonder and awe moment’ as coincidentally, over the Easter holidays a ‘real’ flotsam camera was found and reported in the news. I shared the BBC news story and had gasps and sparkly eyes as they saw the photos that came from it (you can find it here: http://www.bbc.co.uk/news/world-asia-43579098).
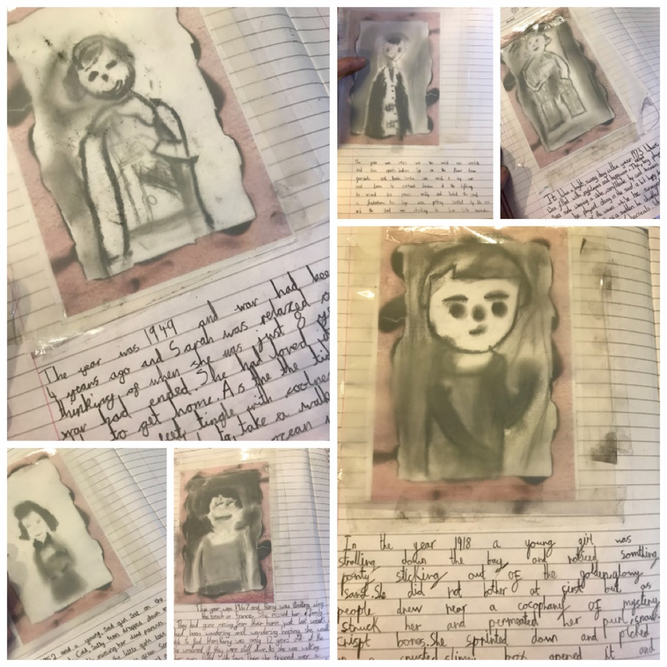
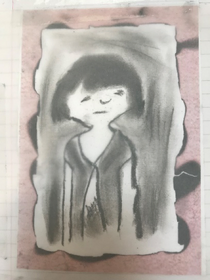
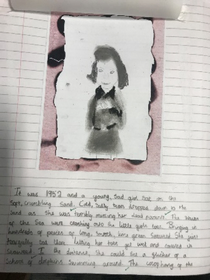
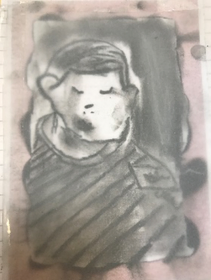
The activity for this session involved choosing a child from one of the photos and generating a back story as to who they were and why they were on the beach. Their imaginations ran wild and every child created their own unique tale from an evacuee in World War Two to a little girl running away from boarding school in 1952 to have fun on the beach! To inspire them to write their stories, they used charcoal to copy the picture into a little frame. Top tip: to stop the charcoal smudging in the book, Sellotape a flap of tracing paper over the top. Here are a few snippets of work to give you a flavour of the session:
Day 4
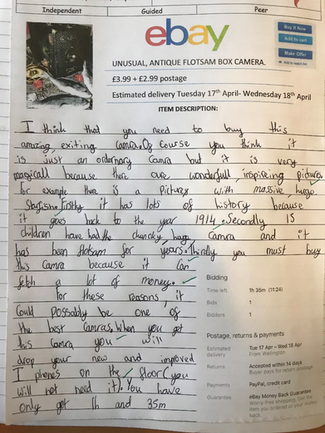
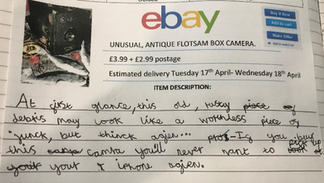
I never plan too far in advance with my Literacy lessons, as I like to see how the week goes and if the children have ideas, and the second week of sessions came from a conversation with the class. They asked me if I was going to sell our camera back to ebay when we had finished with it so other children could enjoy it like in the book. From this I created one of my favourite lessons so far. The children (in their independent work) would eventually be producing a persuasive letter about plastic pollution and this presented the perfect opportunity to start to build the language skills.

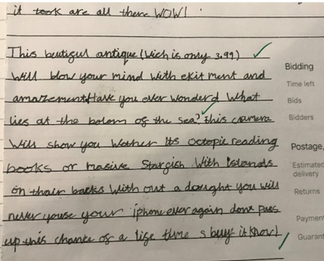
I showed the children a list of phrases used in persuasive writing and orally they had to try and sell each other the camera using the bank of words on the board. I modelled a really exaggerated style of speaking and left them to it. They then shared some of their powerful phrases to scaffold other children in the class and we wrote a few on the board. I loved ‘you’ll never want to pick up an iPhone again once you own this camera’ and ‘you will be holding history in your hands!’
I modelled a W.A.G.O.L.L. (what a good one looks like) opening to their advert on the board which they could use, change or ignore as a support to begin. They were very excited by template I had created and lots of the children used the time scale on the advert within their writing. Here are a few snippets of their wonderful work produced:
Day Five
To build on the previous lesson, I wanted to give the children a chance to use the language of persuasive arguments orally. I decided to hold a debate about whether the boy should return the camera to the sea or keep it. Twinkl have a very good presentation (find it here: https://www.twinkl.co.uk/resource/t2-p-159-new-an-introduction-to-debating-resource-pack) about the features and structure of debates and we used this to begin with. It was particularly useful to showcase the rules and seating arrangements.
I then split the children into teams of 5 and 3 of the teams would take the ‘’for’ argument and the other 3 the ‘against’ argument. They worked together to create key phrases they would use in their arguments and made little cue cards as prompts when speaking. In total we had 3 debates and interestingly, a different stance won each time. It really showed the children the power that words have to persuade and make us change our mind.
I led the first debate and picked equally matched teams who I knew would be strong at speaking to begin with to help model to the less confident children. The other two debates were completely child led and I was able to sit back and observe who was using the persuasive language successfully and adjusting the volume and intonation of their voice in their arguments. It was a productive and enjoyable exercise.
Day Six
In our final session using the book, I decided I wanted to pay homage through wordless drama with a musical soundtrack. The children nearly burst with excitement as I took them into the hall and wheeled out the music trolley. When using musical instruments, it is inevitable the children will toot, shake and bang the second they get their hands on them, as in some cases they might not have touched an instrument for a while. I always like to ‘get it out the system’ and allow them to just experiment freely for the first 5 minutes before I add a formality to the structure.
Once the novelty had been tackled, I explained the task in hand. With something like this, it is very important you model expectation to the children. I showed how various instruments could be used to accompany the story such as shakers for the sea, a bell for timing the photos to be developed etc. I also showed how I would act out various parts such as getting on my knees and pretending to hold a magnifying glass to look at a hermit crab on my hand. As a class we decided how we would show the photos through drama and decided we would ‘act’ out the images.
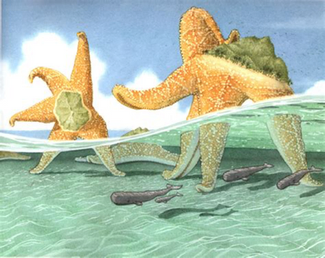
The key to not feeling intimidated in quite a free and potentially chaotic lesson like this is to explicitly model expectation. I also like to continually stop and bring children back to watch short parts other groups are doing to help scaffold their own performances and keep them focused. With activities like this, I am always amazed by the creativity generated by the children and how they all interpret the task slightly differently. I particularly enjoyed a scene where 3 children recreated the photo of the giant starfish with booming drums matching their footfall!
I have really enjoyed using this book and hope some of these ideas may be useful for anyone else unsure how to tackle a wordless picture book in their lessons, especially with upper KS2 children.
———-
Many thanks to @teacherglitter for sharing their experiences using this text.
If you are interested in writing a guest blog post about a text that has inspired your class, please get in touch here.

The book is available to order online from Amazon or Bookshop.Org.
Flotsam also features on the following booklists:
Where next?
> Visit our Reading for Pleasure Hub
> Browse our Topic Booklists
> View our NEWLY UPDATED year group booklist
> More picture books suitable for Upper KS2
> See our Books of the Month.